Saturday 26 December 2015

How to Apply an Appliqué in 10 Easy Steps


Step 1:
Trace each appliqué piece onto the paper side of your fusible webbing.  Leave approximately 1/2" between each pattern piece.
Step 2:
Cut out the traced pieces .  Be sure to leave approximately 1/4" of extra webbing around each piece.

Step 3:
Position the fusible webbing pattern pieces onto the wrong side of your appliqué fabric.  Use your iron to fuse the pieces.  Do not use steam.


Step 4:
Cut out the pieces along the traced lines.


Step 5:
Remove the paper backing and position the appliqué pieces onto your project, with the webbing side down.  Layer the pieces as directed by the placement guide.


Step 6:
Place a pressing cloth over the appliqué design and fuse with an iron, following the manufacturer's instructions.


Step 7:
Cut a piece of stabilizer that is approximately 1.5" - 2" bigger than the appliqué design.  Position the stabilizer on the wrong side of your project fabric, underneath the appliqué.  Use pins or baste the stabilizer in into position.


Step 8:

Set your machine to a zigzag stitch and stitch around the appliqué.  You can use coordinating thread or contrasting thread, depending on the project and the look you wish to achieve.  You can also change the thread colour for each appliqué piece, as desired.

Step 9:
Remove pins or basting stitches from stabilizer and trim stabilizer as close to stitching as possible without cutting through the project fabric.

Step 10:
If applicable, apply finishing touches to project - this could include sewing on extra trims and notions, or drawing on accents with a fabric marker.


Monday 16 November 2015

More Signature Cowls from Player Two Apparel


…yet another cowl that I sewed for sale on my Etsy Shop.  I love mixing and matching the colours and prints.


Saturday 12 September 2015

Saturday Sewing

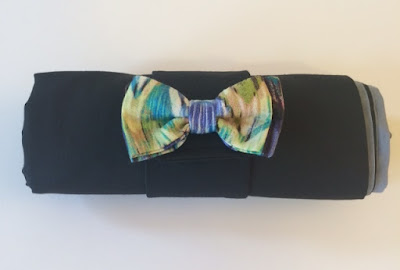
I love Saturdays because I wake up early, get a coffee from Tim Horton's, and do some sewing.  Today I made another Player Two infinity scarf for my Etsy shop.  I found that if you roll the scarf up and wrap the bow band around it, it becomes compact, and perfect for storage.


Thursday 10 September 2015

Player 2 Patterns: Infinity Scarf with Bow Band

This is my latest project.  I've made this type of infinity scarf before, but this time I added a removable bow band.  I've posted this particular item for sale in my Etsy shop: Player Two Apparel


Thursday 20 August 2015

Re-make of Simplicity 2315 Skirt (with Modifications)

In a previous blog post, entitled Faux Snake Skin Skirt: Simplicity 2315, I wrote about having sewn a pencil skirt from the Simplicity 2315 sewing pattern.  This is one of my favorite skirts.  I wear it all the time, which is why I've decided to re-make the pattern.

My inspiration for wanting to re-make Simplicity 2315 is a linen blouse I purchased from Joe Fresh that I think will look great with a pencil skirt.  I bought the blouse because I instantly fell in love with the dragonfly print and the flouncy sleeves.  Back in college, when I was a fashion design student, I would often draw flouncy sleeves on sketches of summer dresses and blouses.

I have a few meters of a vibrant blue cotton sitting in reserve on my fabric shelf for just such an occasion.  The blue in the skirt really brings out the small hints of blue in the dragonfly pattern.

For this project, I will be making view A and eliminating the tabs.  The waistband of the skirt will be covered by the blouse when I wear it, so I felt that it wasn't necessary to include any extra embellishment there.  An additional change I am making is that I've decided to shorten the length by 2.5".

I will post pictures of the skirt upon completion.

Simplicity Pattern 2315
 
This is the fabric I will be using for the skirt


Joe Fresh summer blouse that I bought

Note the flouncy sleeves

Saturday 25 July 2015

Another Sewing Tip in Threads Magazine

Another one of my sewing tips has been published in Threads Magazine.  This is my third tip to be published so far.  Pick up a copy of the August/September 2015 issue of Threads to read it!

Tuesday 14 July 2015

Sketch by my Professor

When I was in first year college, my fashion design Prof. stopped by my desk one day and decided to whip up this sketch in my sketchbook.  I'm always inspired whenever I look at this and think of the encouragement he gave me when I was just starting out.  I think that I will probably frame this for the wall in my sewing room.

Saturday 6 June 2015

Draping for Fun

I have several yards of a floral printed chiffon on my fabric shelf that I bought a few years ago.  I didn't have a project in mind when I bought it, I just really fell in love with the colours and the print.  I thought it would be fun to drape it on my dress form just to see what I could come up with.  I think it would look great as a breezy, flowing maxi-dress.


Tuesday 26 May 2015

Mint Teepee and Plaid Scarf

A while back I wrote about the fabric I ordered from Spoonflower from a shop called Kimsa. 
(Click here to read: Kimsa Fabric from Spoonflower)

I finally got around to making the scarves I had in mind with the fabric.
You can see pictures of the final project below, and in my Etsy Shop


Sunday 24 May 2015

More From the Fashion Archives

In October 2009, my friends and I were fortunate enough to be able to attend the David Dixon show at Toronto fashion week in order to view his upcoming Spring/Summer collection. 

This picture was taken outside of the venue, where we caught a glimpse of Sunny Fong of Vawk, the winner of Project Runway Canada, Season 2.  We wanted to have our picture taken with him, but in the end we were too shy to ask.  Therefore, we ended up with this picture, of just the three of us.

Dominique, Shir, Me

Friday 24 April 2015

Pink Plaid Two-Toned Infinity Scarf

I purchased this pink and black plaid fabric for a collection I was designing while I was in school, but since I had a ton of it left over, I decided to turn it into some of my famous two-toned infinity scarves. 


Wednesday 22 April 2015

Pink Boho Tie-Dye Scarf


 This scarf was simple and easy to make...all I did was cut the fabric and serge the edges using the rolled hem setting on my serger. 


Sunday 22 March 2015

Fashion Friends!

This is a picture of me and some friends from Seneca College, just before our big fashion show and graduation.  The picture was taken in a room called "The Homework Room".  The homework room is equipped with sewing machines, sergers and all of the other equipment we needed access to in order to finish our projects and to get our homework completed on time.

I had many fun days (and late nights!) in the homework room with my friends (that's me in the first row, second in from the right).